Sunday, October 12, 2014

Glitterfest Hangover

Well my crafty friends, Glitterfest is officially over and now I've got a Glitterfest hangover!  Surrounded by so much luscious crafty awesomeness and uber creative people in the last 24 hours, I am utterly spent!  Not to mention, I worked so hard for this show and so hard during the show, that now I'm in recovery mode.  But it was definitely worth it!

The show itself is just so awesome and every single booth/table is a smorgasbord for the eyes. You really need to allow plenty of time to just take it all in.  Clay figures, wacky wool and felt dolls, waxed sculptures, glittered animal figurines, dazzling rhinestone tiaras, glittery bottle brush trees in all colors and sizes.....I was virtually drunk with inspiration!

The best part was seeing the customers reactions to my own creations. My table was littered with fancy antique plate party platters, whimsical Christmas villages fit for a fairy and the faces of sweet little vintage girls smiling from vintage tart tin ornaments.  Peoples faces really lit up as they perused the items before making a purchase.  My favorite moment was when a little girl, about 7, walked up and exclaimed "I want to live here!" as she pointed to my table.

Overall, the show was a success on many levels.  I sold a good amount of course, but I also met some great people, handed out a ton of business cards, collected 2 pages of emails from new enthusiasts and received a request for submission from an editor at my favorite publisher...Stampington!

I loved this show as an attender in the past and now I hope to continue to be a part of it as a vendor!


Wednesday, October 1, 2014

The Problem with Pretty Plates!

Oh dear.  I must address my current obsession with beautiful plates, antique or otherwise.

Now this isn't really a new obsession, heaven knows I've been collecting them forever.  But once I realized I could make something really cool to sell at the craft shows, give as gifts, etc. my obsession took a ridiculous turn, dragging me along for the ride!

Once given a legitimate reason for collecting these little gems, my addiction went full throttle!  I started buying them up by color, by size, by style....at thrift stores, antique stores, yard sales.....anywhere I could get a good deal.  They began to collect on the bed in the guest room, forming rickety towers in the hallway....heck, I even cleared out shelves in my linen closet.  Who needs towels when you have a stack of Liberty Blue beauties in need of a home!? 

Well, okay.  Enough said.  Now take a look at a few of the incredible serving pieces I have been creating with all that china.....just in time to sell at......GLITTERFEST!

Aren't they GORGEOUS!!?  I really enjoy making them too....and it's a good thing since I have enough product now to make a gazillion!!

Be sure to stop by Glitterfest if you can and have a peek at the beautiful works of art I've been creating with my Pretty Plate Obsession!

Friday, September 26, 2014

More GOODIES for GLITTERFEST!

Hello friends and vintage lovers!

I hope you're ready for lots of fall festivals and holiday boutiques because it is now OFFICIALLY AUTUMN!!

Truth be told.....I'm not as big a fall lover as some folks I know, but once those adorable autumn decorations start showing up in the stores, I know that my FAVORITE HOLIDAY is not too far away........CHRISTMAS!  Please don't hate me, I know it's too early for most people to even think about, but I just love it!  Can't help myself. 

I've been working on Christmas stuff all year to sell at Glitterfest and other holiday craft shows.  Check out these sweet vintage-y ornaments I'll be selling at Glitterfest:


Come by and check out this really cool show if you can.  You will be amazed!!

GLITTERFEST
Oct. 11, 2014
10:00 - 4:00
Admission: $7
1960 South Anaheim Way
Anaheim, CA.

Thursday, September 11, 2014

GOODIES FOR GLITTERFEST!

Hello everyone!  We're having a crazy hot indian summer out here in southern California!  Can't really complain, though, since the summer as a whole has been beautiful.  Besides, I've been spending most of my time burrowed in my craft room under the cool shelter of air conditioning.  That's because I've been busy making beautiful crafty treasures to take to GLITTERFEST!

Before I go any further, let me just extend a happy invitation to everyone to come and check it out!  Here's all the info:

GLITTERFEST
Oct. 11, 2014
10:00 - 4:00
Admission: $7
1960 South Anaheim Way
Anaheim, CA.

And here's a sneak peek at one of the gorgeous Christmas Villages I've been making:


I just love making these pretties!  They are loaded with detail and sparkle and are pretty enough to keep out all year!  You will definitely fall in love!
 
That's it for today, but stay tuned because I will be posting more pics of the delightful treasures I'll be selling at GLITTERFEST!  Can't wait to see your sweet faces at the show!!!
 
Love and hugs,
Sandy the Vintage Mouse 


Saturday, August 9, 2014

GLITTERFEST Fall 2014

Hey there friends, family & kindred spirits!

I am soooo excited to announce that I will be selling my handmade vintage treasures at GLITTERFEST this fall!

If you've never been to this amazing show, you MUST come and check it out!  Sooo many creative souls selling their uber-incredible crafty wares.  I am thrilled to be included in the lineup! In addition, there are vendors selling really cool craft supplies too.

Stay tuned for some sneak peeks of my crafty creations that will be for sale at the show!

Wednesday, August 6, 2014

My Little Owl Ornaments

I've been so busy having fun this summer that I just haven't been able to give my blog the proper attention it deserves.  Now that the grandkids are headed back to school, maybe I can remedy that!

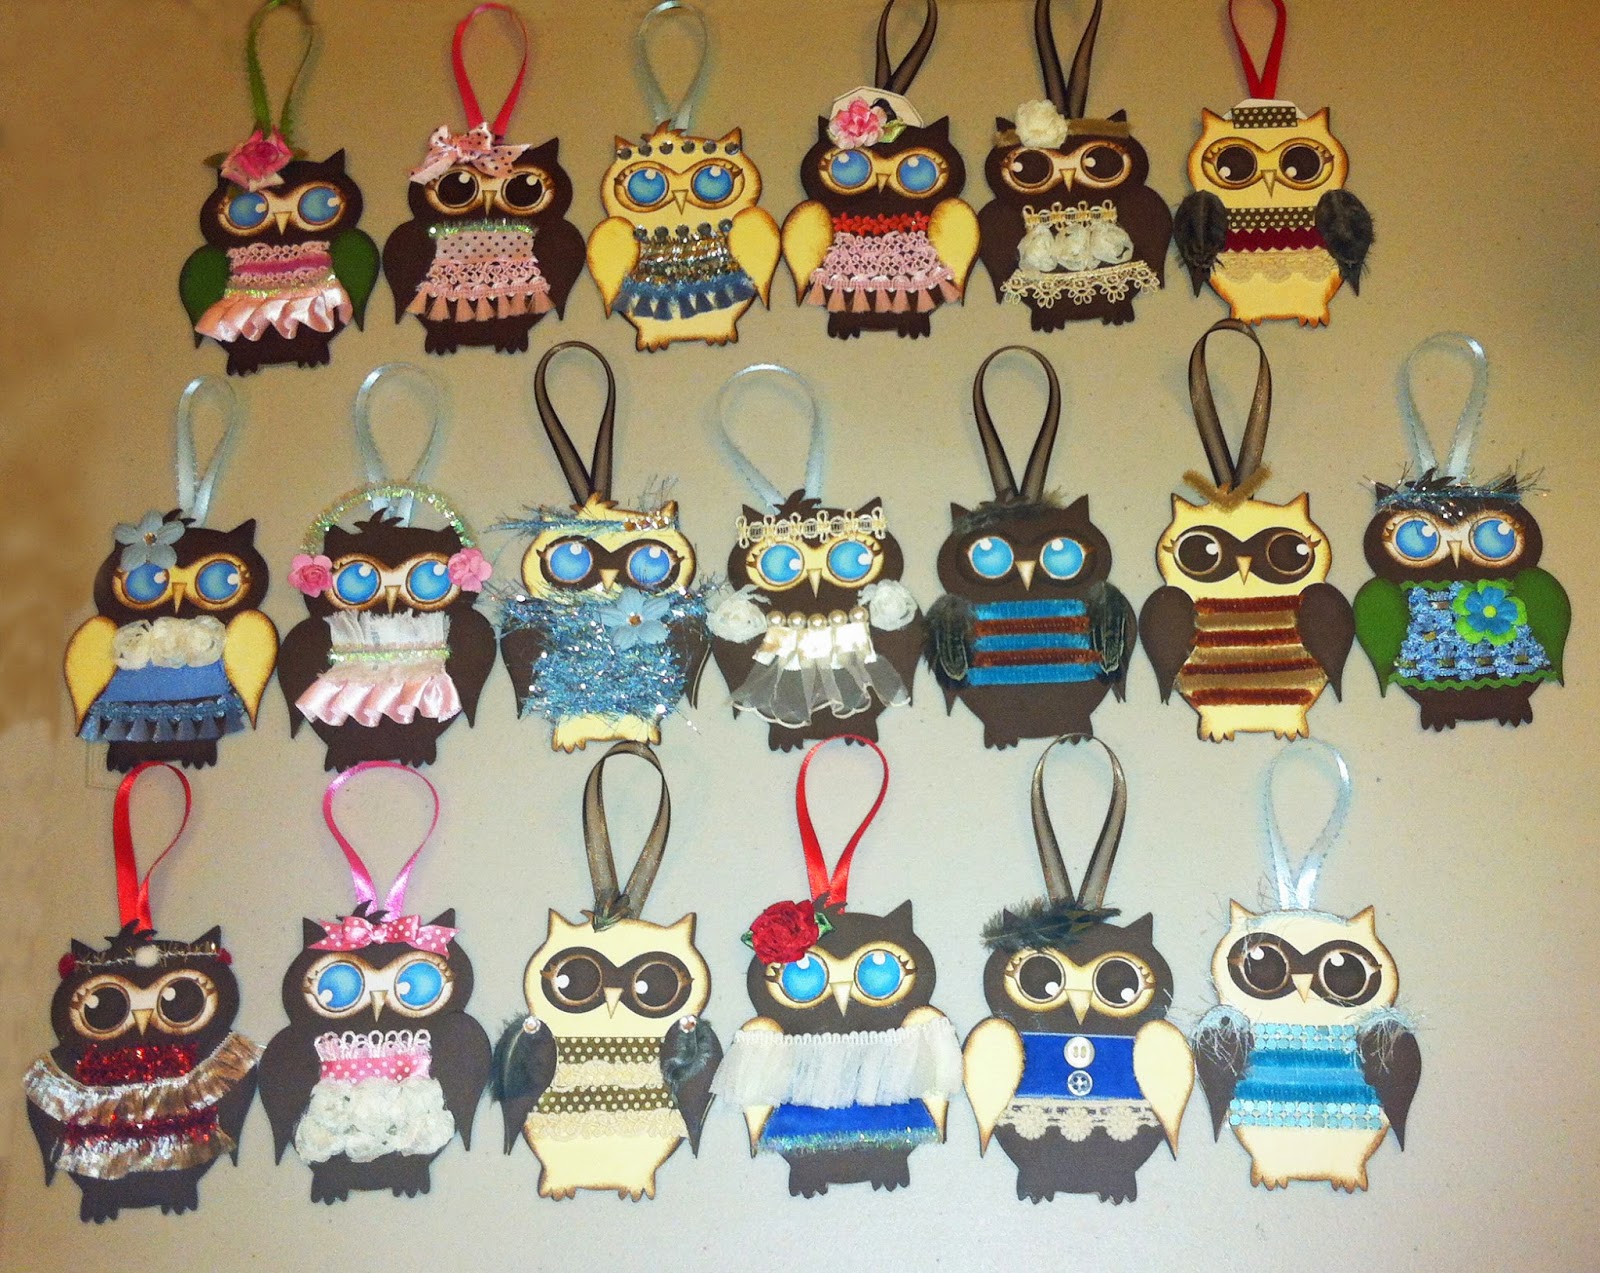
I thought to myself, what can I share that would be simple and fun and kinda fall-ish, since the stores seem hell bent on making sure we know that Fall is right around the corner!  After shedding a lil tear and saying goodbye to summer, I remembered this cute lil owl ornament that I made and sold at the craft fairs a couple of years ago.  Everyone loved them and I think you will too!

I actually created this lil guy on a program called Make the Cut and saved it as an .svg file which I am including as a free download via Dropbox.  Just click on the link below and download to your computer. This means that you will be able to cut the patterns on a cutting machine like the Cricut (Explore only) or the Silhouette.  Just use your open or import command and select the file.

If you don't have a cutting machine, you can still make the owl old school style.  Just click the link below for the .pdf  file and it will take you to Dropbox.  From there you can download the file and print or print directly from Dropbox.  Just remember to keep it the original size, not  fit to page.  After it prints, cut out the template parts of the owl by hand and use them to trace the parts on whatever colored cardstock you desire.
Cut them out and follow the instructions below:

Click here for the .svg owl project file
Click to access the .pdf owl project file

Here are the supplies you will need:


Creating this owl is fairly simple.  Start out by cutting the body from chipboard.  This will make it sturdy. This lil guy should measure roughly 3" wide and 4 1/4" tall overall.

Next, cut out 2 of the same body shape from cardstock.  One for the front and one for the back.  But before you glue them onto the chipboard body, cut a piece of ribbon 71/2" long, make a loop and glue it to the back, about an inch down from the top of the head.  This will serve as a hanger.  Now, when you glue the cardstock bodies onto the chipboard, the raw ends of the ribbon will be nicely concealed.  Tip:  inking the edges of all the owl parts gives them even more charm!  Use an ink dauber and inkpad for this.

Now you can begin adding all the parts starting with the eye base, lashes, pupils, wings and a little triangle for his beak!  I like to use the Beacon 3 in 1 glue because, even though it can be a little messy, I know everything will stay on for good!  It just takes a little getting used to :)


The final step is the fun part!  Embellishing!  I like to decorate their little bellys with fun things like lace, rhinestones, feathers, ribbon, buttons.....whatever!  Just look below at the adorable photos for inspiration.  I plan to decorate a few exactly alike in the same colors for a sweet little fall banner.  If you decide to use any part of this design or tutorial on your blog, website or to make and sell, I only ask that you include me and my blog in the credit as the designer.  Thanks!


Tuesday, May 13, 2014

I'm back!!

Hello friends!

It's been awhile hasn't it?!  I know it's been a year since I've posted to my blog, but I have been soo busy.  I just had too many things going on and now that I've done a little pruning, I hope to have the time to blog more.  I just tried to do too many things (hello, I'm a Gemini), and all of them were fun, but didn't leave me enough time to re-fresh my creative spirit.  Okay, enough of that!

I hope you all had a lovely Mothers Day!  I had a great day hanging out with my hubby, daughter, son-in-law and my precious grandchildren.  The saying goes, "April showers bring May flowers" and it was so true on this Mothers Day.  My daughter brought me a gorgeous star gazer lily that is still welcoming me every morning with a fragrant hello.  And since my garden was ablaze with the scent of  jasmine and roses galore, I picked myself this glorious bouquet!  I had to take some pics to share and scrapbook. Hope you enjoy!


Every one of these beauties came from my garden!


Some tips for keeping your cut flowers looking good:
Start out using a pinch of flower food like the ones in the above photo, in your vase of water.
Cut fresh tips on each flower so it can drink up the water easily.
Remove leaves from the bottom part of the stem that will most likely be submerged in the water.

Here's probably the most important tip:  change the water EVERY day!  This will remove most of the bacteria that is growing in the water and keep your flowers looking happy for a long time!


,
This is the life!  My beautiful garden, babbling fountain in the background, a fave magazine and my big kitty Simba!  I love this time of year!


A cute card and ornament I designed for a workshop at home using Close to My Heart stamps. I'm a consultant for CTMH.


Isn't this the sweetest little ornament?!  I found the plain little chipboard boxes for 25cents each at Junque Trunk, a really cool flea market in Tustin, CA.  Junque Trunk is sponsored by Whimzy, an equally awesome brick and mortar store that sells incredible vintage goodies!

Thanks for stopping by!