
Sunday, November 1, 2015
Published!
I'm so excited! I've been published in the Winter 2015 issue of Greencraft Magazine. I am a big fan of all their publications, especially the Somerset series, so this is a really cool deal to me. My sweet little Tart Tin Ornaments are being featured in the Gallery section of the magazine, which hits newsstands tomorrow, November 1st, 2015. If you like what you see, be sure to check out and "like" my Vintage Mouse Facebook page, where I have lots of photos of all my creations and craft shows I participate in. https://www.facebook.com/AVintageMouse/

Thursday, July 23, 2015
Color My World!
Things are heating up over at the Vintage Mouse workshop! With the holidays looming closer and closer, I am working non-stop, trying to create plenty of product for the holiday shows. My first is in October and I want to be prepared! Along the way to building my fabulous creations, I am constantly in need of specific colors of flowers, ornaments, bottle brush trees, etc. Now I definitely have ALOT of goodies to work with, but for some reason that drives me crazy, I never seem to have the RIGHT COLOR of flowers, etc.! But NOT ANY LONGER!! Thanks to the awesome Color Lab diy paint kit by Marion Smith Designs, I can custom create any color I need and use it to dye the flowers, etc.!!! Nowadays I tend to buy the supplies in white and use the Color Lab to dye them. You can find more info online, including videos, just google Color Lab. Here's a quick overview:
 |
| Here's what the kit looks like inside. You get 3 sprayers, 5 jars with 5 different pigment paints, 3 jars of sparkling pigments, a measuring spoon and recipe card. |
 |
| As you can see, I've mixed a batch of turquoise and sprayed my white flowers for a beautiful color! The directions are easy to follow and there are tons more recipes online, but I used the Curious recipe from the recipe sheet in the kit for this batch. |
 |
| I just love the variety of color you can get by spraying more heavily. You can also lighten by running water over it! This is definitely a huge help when I don't have that "JUST RIGHT COLOR" on hand! No more emergency runs to the craft store! |
Tuesday, June 2, 2015
Bottle Brush Blues
How's it going my crafty friends!? I've got a new post AND a tutorial for you this time!
One day a few months ago while out pickin' my favorite thrift and antique stores I came upon a bunch of those pretty silverplate casserole dish holders, all of them missing their glass bowl and lid. Each of them had a different cutout design and 3 unique little feet to hold them just a tad above the table surface. I could hear them calling my name...."please rescue us Vintage Mouse". Then it hit me....I could use them as a base for my Christmas Villages! Usually my villages are pink and black and very shabby chic, but suddenly I saw them in my minds eye on these silverplate beauties, blues and greens and white frosty wonderlands with bottle brush trees of icy blues and turquoise greens! Inspiration hit me like a winter storm! I purchased them all and headed straight for my craft room. Now I realize that it may seem strange writing about this in June, but you have to remember that I work all year long on Christmas items that I sell at shows during the holiday season. I have created several of these snowy village beauties and they have turned out gorgeous! I will share more of that later in a separate post...
Now I have bleached many a bottle brush tree to use in my villages, but never have I dyed one and I really wanted some blue and turquoise green trees to use in these new villages. So I hit the internet in search of directions on how to dye a tree. There are LOTS AND LOTS of sites that tell you how to do it and just as many different methods. Some use a fabric dye like RIT and Tulip, some use paint, some use a spray like Glimmer Mist or Color Lab by Marion Smith. I decided to try the fabric dyes and here is my take....although I was mostly quite happy with the results, they were a little difficult to reliably reproduce. I used Rit and also Tulip, on separate occasions and found that they produce differing results. RIT seemed to dye darker and faster. On my first try, I followed the directions on the package. After that I used a lot less water with the Tulip, because it seemed to take forever and I couldn't get the saturated color I wanted, sometimes even leaving them in there overnight. I also experimented with an ombre effect, standing the trees up in the dye solution, with only the lower third of the tree submerged. There was definitely some experimenting and monitoring involved, and of course, a degree of messiness, but overall a fun experience and gorgeous trees!
Here's how I did it:

 Follow the directions on the package of dye. Use your gloves and make sure the water is HOT. I used a little less water than the pkg says because I wanted my trees to dye a little darker and quicker.   |
| To accurately gauge the color of the tree, I rinsed it periodically. I did an ombre effect by adding some dye solution to a separate small bowl so that the bottom third of the tree is submerged. I stood the tree in it upright and left it there for 30 minutes. Then I came back and added more dye solution to cover the midde third and left it in for 30 minutes. To color the top third of the tree, I used tongs to hold it upside down in the solution for a minute or so.  I plan on trying out the spray coloring technique next time using Color Lab pigments by Marion Smith Designs. I'll keep you posted. |
Friday, April 24, 2015
Crafty Crowns!
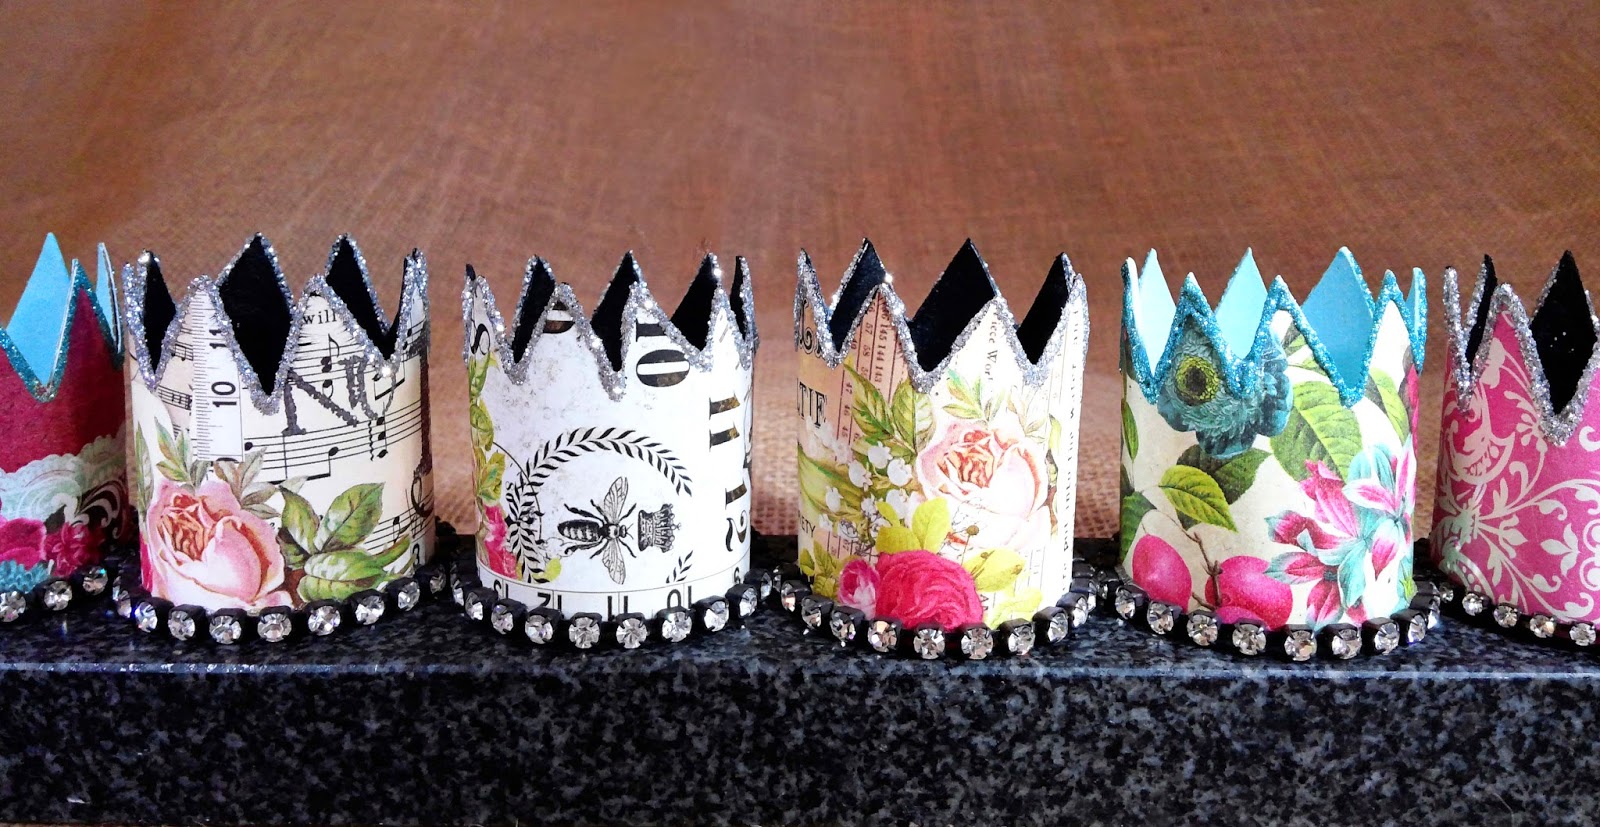
Pretty cute, huh? First you'll need some supplies:

The crowns are made from a 2" long section of chipboard tube. You can use a paper towel core or if you have no objections....a toilet paper core. I use the paper towel core of course but either works!

Cut a piece of decorative paper 2" by 6" long. Brush Mod Podge onto the outer surface of the tube and quickly glue on your paper so that the decorative image is on the outside. Allow to dry.

Paint the interior surface of the chipboard core using a coordinating color. Allow to dry.
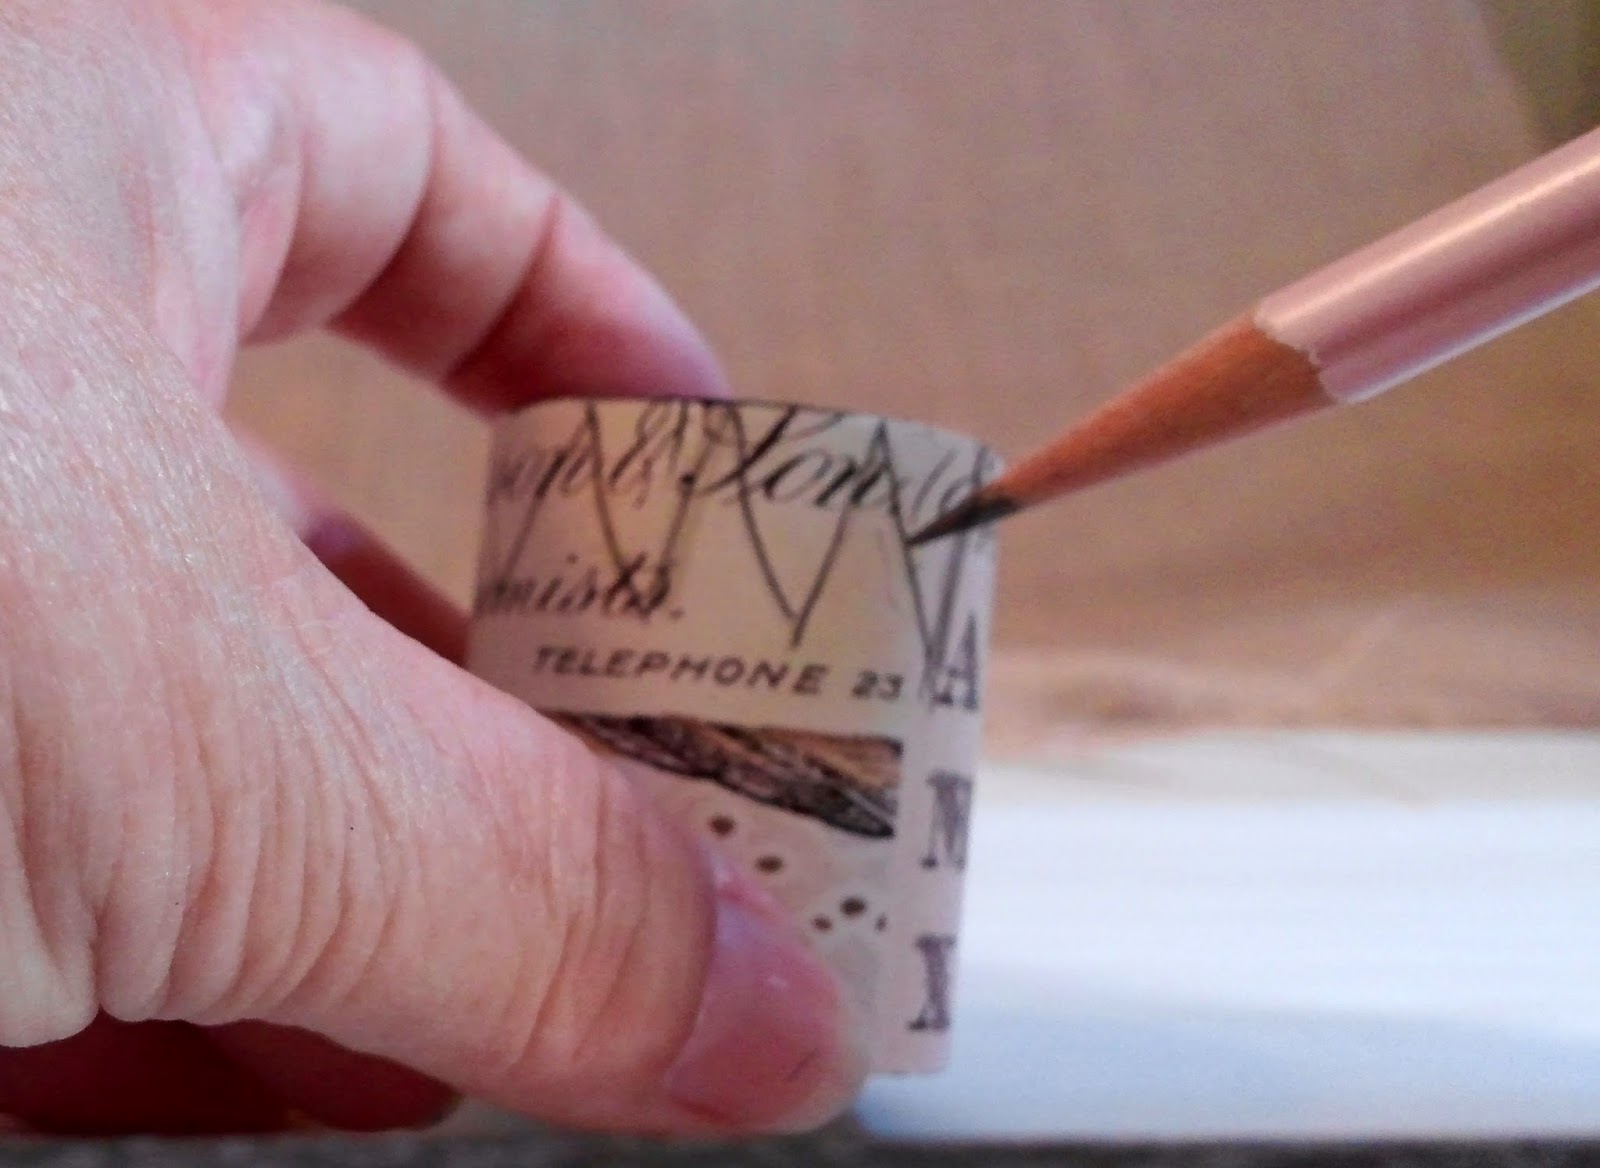
Using a pencil, draw guidelines onto the paper to represent the points of your crown.

With scissors, cut the tips along the pencil lines. Erase any stray marks with a white plastic eraser.
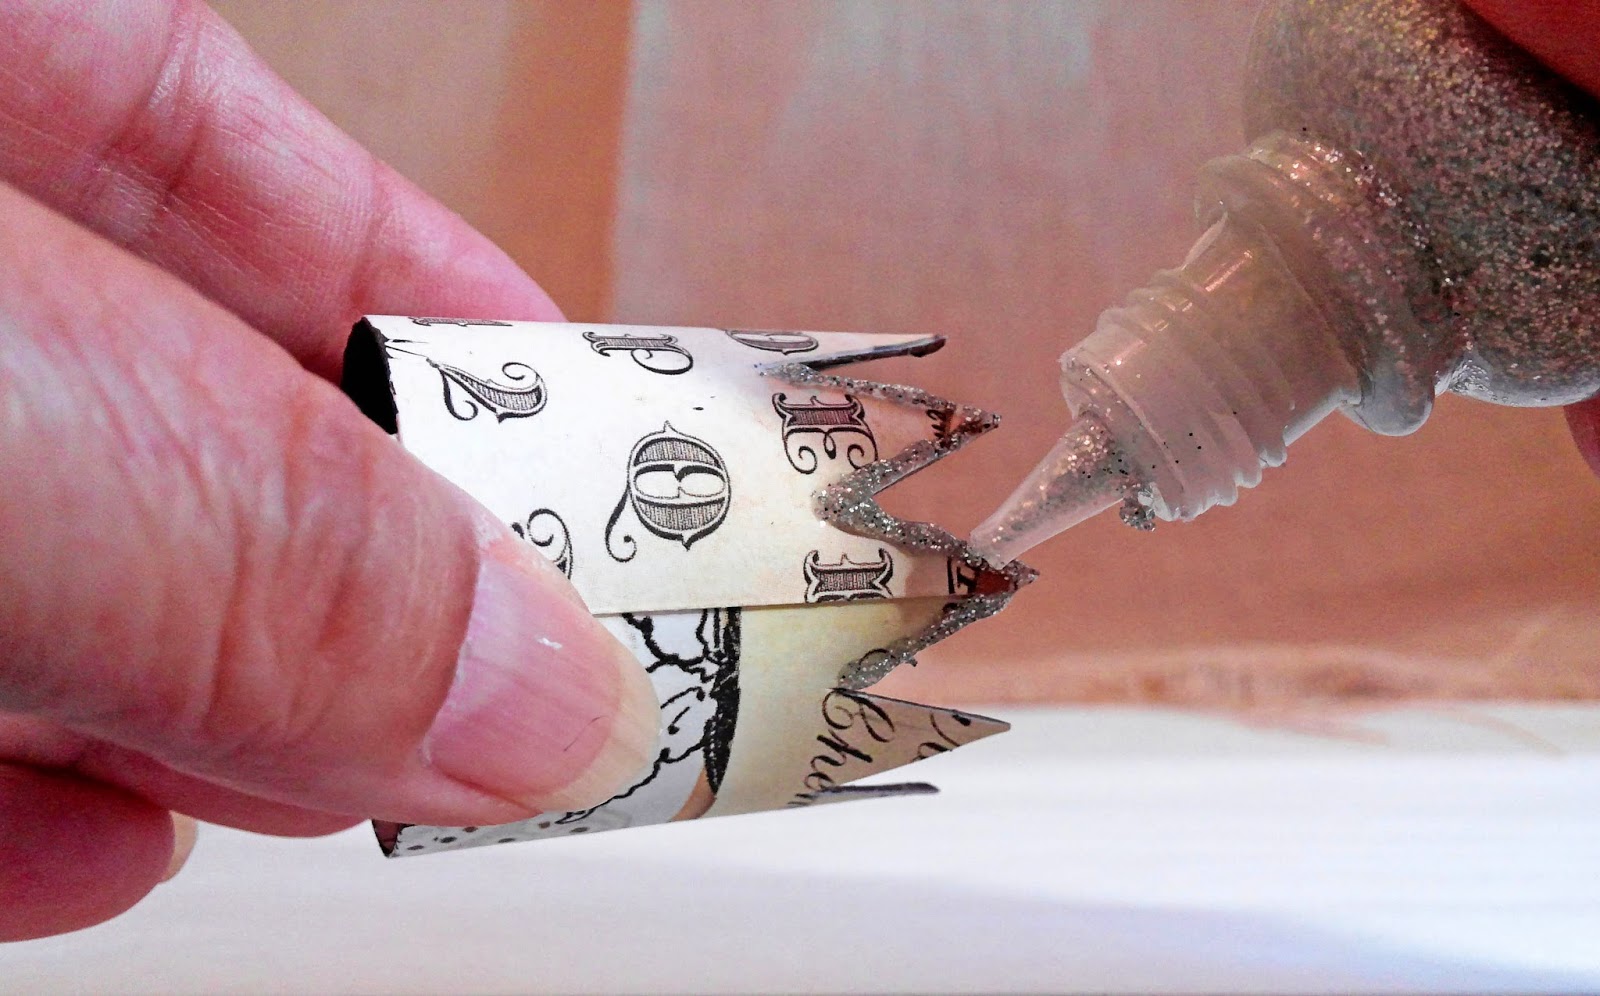
Apply glitter glue in a coordinating color along the edges of the points.
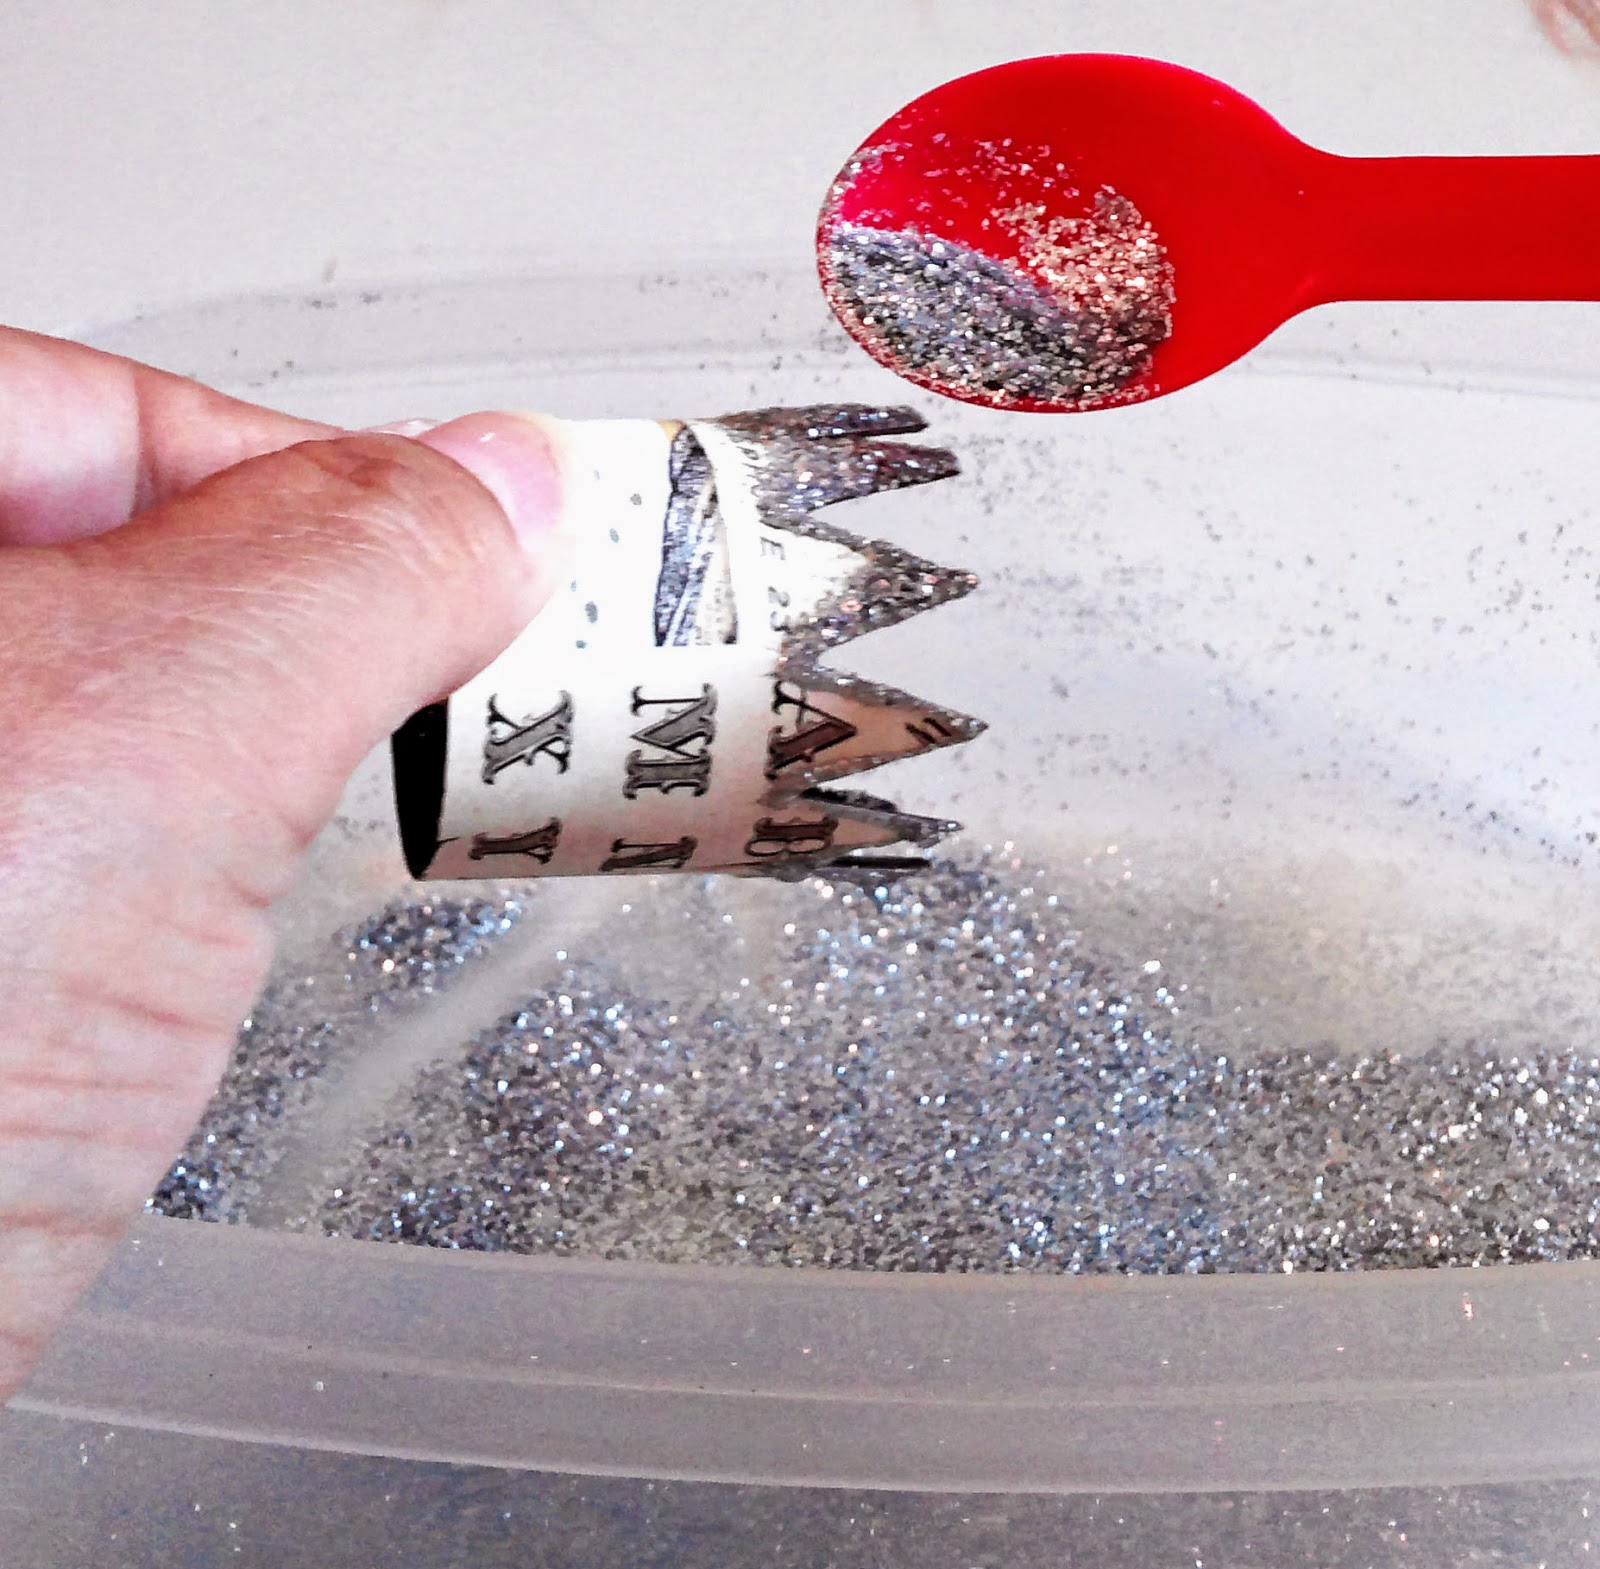
BEFORE the glitter glue dries, sprinkle fine glitter on top of it. This creates a really sparkly look. Allow to dry.
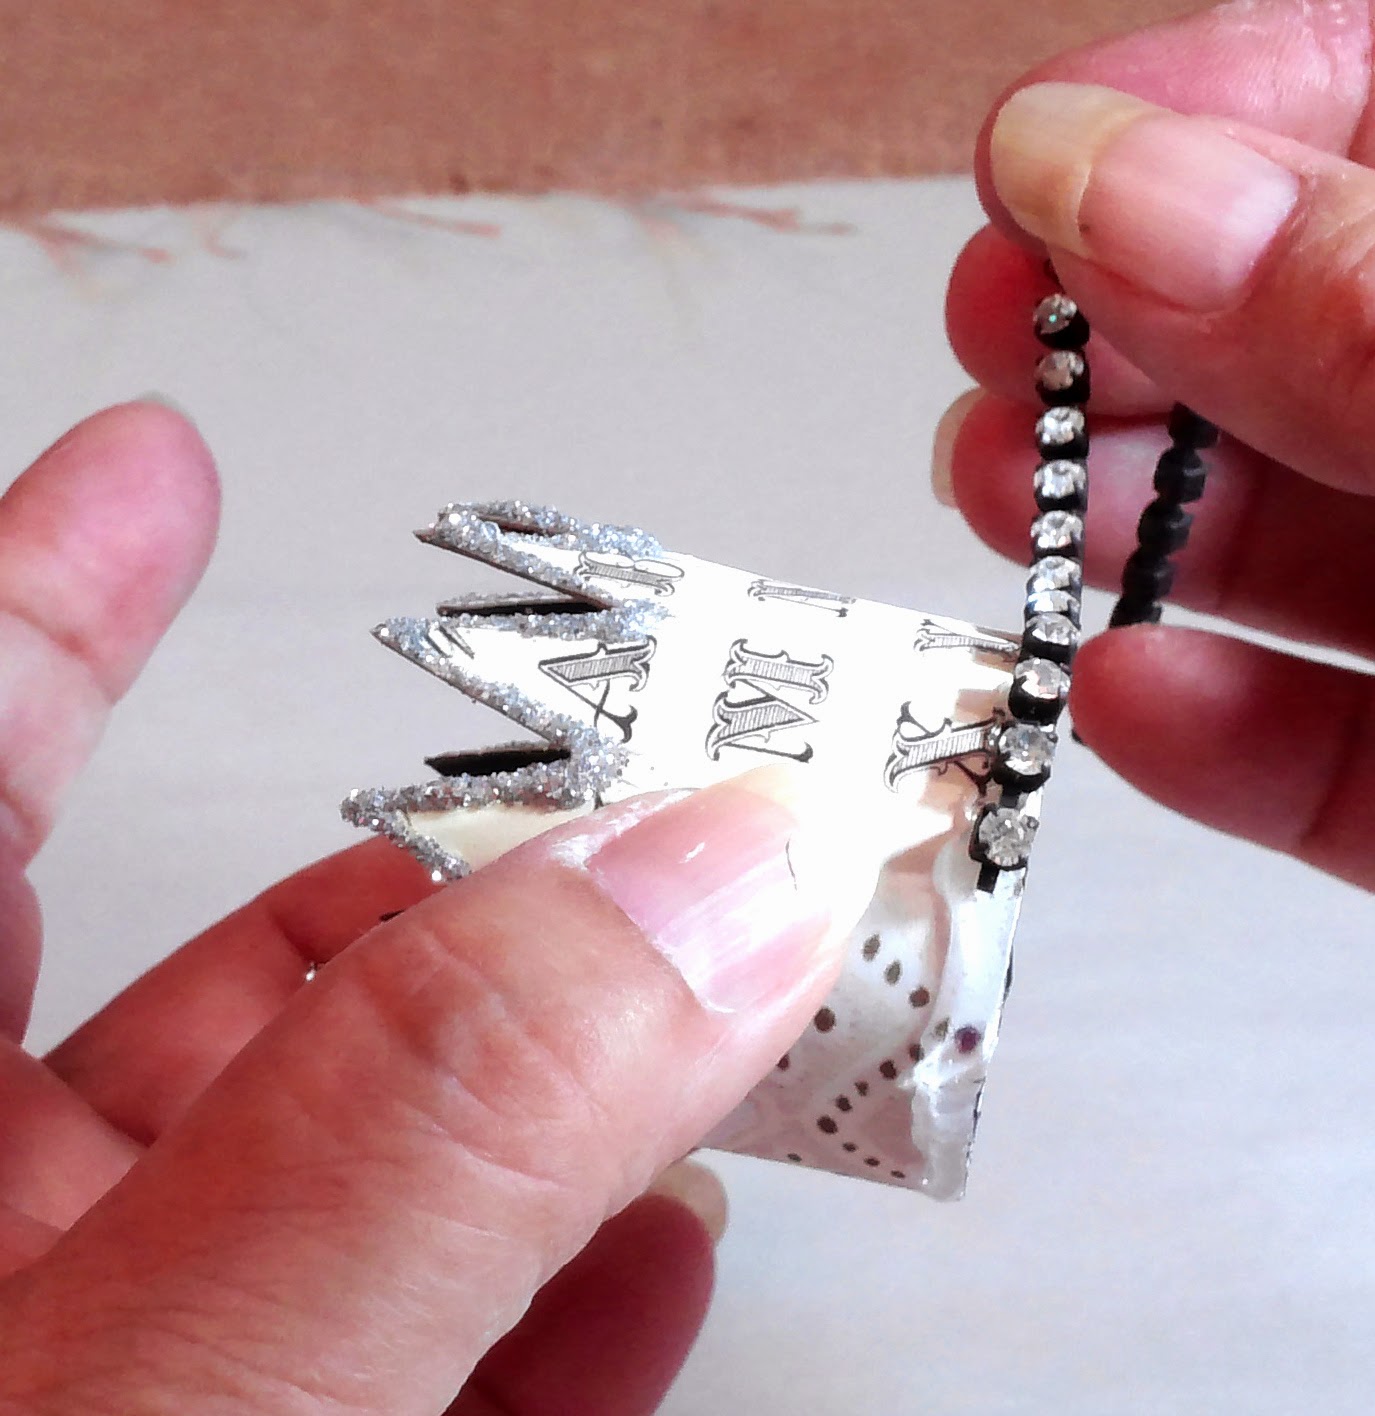
Cut a piece of rhinestone chain approximately 5 1/4" long and adhere to the bottom edge of the crown using Beacon 3 in 1 adhesive. Allow to dry.
And that's it! You now have the cutest little crown that can be used in lots of charming ways.
Take a look:


Glue them onto headbands for a festive one-of-a-kind crown!

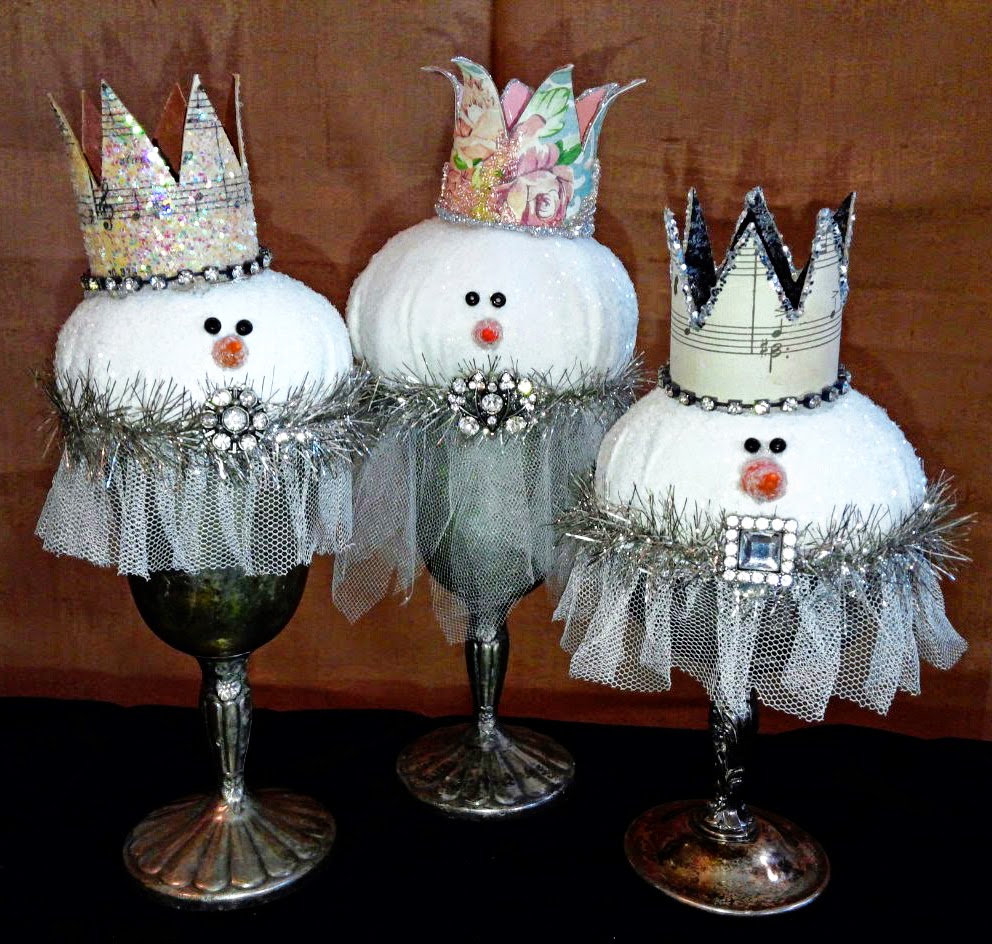
And of course....they top off my sweet little Snowball Kings!
Wednesday, February 25, 2015
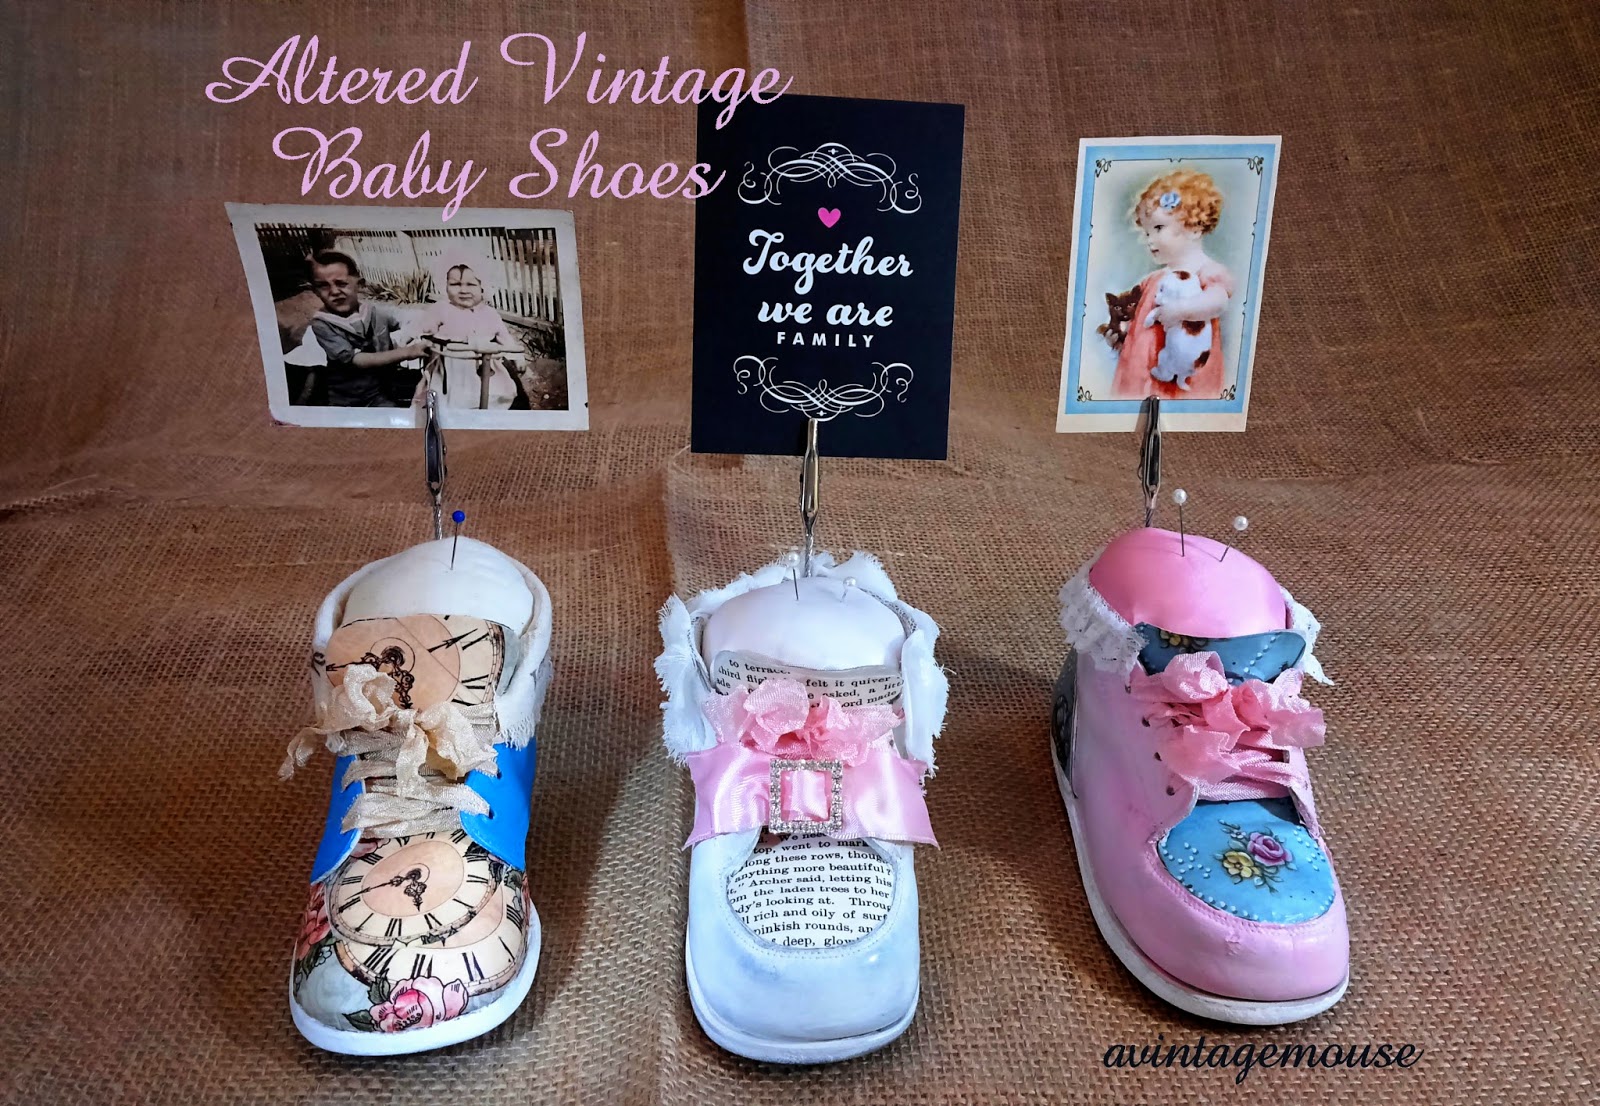
Baby shoes.....who knew?
A while back, I ran across a bunch of vintage white baby shoes during one of my pickin' adventures. They were so cute and I knew I could do something with them, so I bought them all. I ended up altering them into photo holders, pin cushions and bird nests and they sold well at various craft shows. They make the best baby shower gifts but also look cute in a shabby chic decor, changing out the photo or saying to reflect the holidays or just as you like. I only have a few left now. But here's a peek at some I will be bringing to Glitterfest this Saturday!
It's been awhile.....
Sorry friends, that I have been missing for a couple of months. I had a loss in the family that really took a toll. Then the birth of my sweet granddaughter turned our holidays upside down. I'm doing much better now and I will be participating once again in Glitterfest Spring 2015.
-1.jpg)
Sunday, October 12, 2014
Glitterfest Hangover
Well my crafty friends, Glitterfest is officially over and now I've got a Glitterfest hangover! Surrounded by so much luscious crafty awesomeness and uber creative people in the last 24 hours, I am utterly spent! Not to mention, I worked so hard for this show and so hard during the show, that now I'm in recovery mode. But it was definitely worth it!
The show itself is just so awesome and every single booth/table is a smorgasbord for the eyes. You really need to allow plenty of time to just take it all in. Clay figures, wacky wool and felt dolls, waxed sculptures, glittered animal figurines, dazzling rhinestone tiaras, glittery bottle brush trees in all colors and sizes.....I was virtually drunk with inspiration!
The best part was seeing the customers reactions to my own creations. My table was littered with fancy antique plate party platters, whimsical Christmas villages fit for a fairy and the faces of sweet little vintage girls smiling from vintage tart tin ornaments. Peoples faces really lit up as they perused the items before making a purchase. My favorite moment was when a little girl, about 7, walked up and exclaimed "I want to live here!" as she pointed to my table.
Overall, the show was a success on many levels. I sold a good amount of course, but I also met some great people, handed out a ton of business cards, collected 2 pages of emails from new enthusiasts and received a request for submission from an editor at my favorite publisher...Stampington!
I loved this show as an attender in the past and now I hope to continue to be a part of it as a vendor!
Subscribe to:
Posts (Atom)